Archive for November, 2007

28
Nov
07

cubeField

Some screenshots from something I’ve been tinkering with for a while, which I finally got working last night.

The input is the iSight cam on my laptop. The heights of the blocks are scaled according to brightness samples taken with the new Image Pixel patch, at gridpoints on the input image.

Aliasing is much less obvious when the effect is ‘live’. Having said that, I may still investigate ‘supersampling’ (ie rendering to an image at a higher resolution, then scaling it back down for display), to smooth out the edges a little.

cubeField qcFX 01

cubeField qcFX 01

cubeField qcFX 03

cubeField qcFX 04

28
Nov
07

zoomDistort Variation

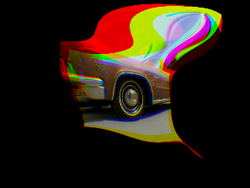
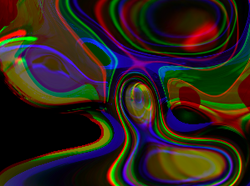
I’ve been tweaking the zoomDistort code, and have added seperate zooming for the Red, Green and Blue channels.

The zoom kernel code is very similar to the zoomRGB FX, with a couple of extra lines added to handle the brightness values from the input image.

/*
Zoom kernel courtesy of Vidvox
http://vidvox.net/phpBB2/viewtopic.php?t=1785&sid=1c5efa0005881bf0dc59f84b3498a7ed
*/

kernel vec4 tb_zoomDistort_RGB(sampler Image, sampler Distortion, vec2 Center, float Level, float DistLevel)
{
vec2 loc;
vec2 modifiedCenter;
Center.x = Center.x / 2.0;
Center.y = Center.y / 2.0;

vec4 pix = sample(Distortion, samplerCoord(Distortion));

float zoomR = Level + (pix.r * DistLevel);
float zoomG = Level + (pix.g * DistLevel);
float zoomB = Level + (pix.b * DistLevel);

loc = destCoord();
loc = samplerTransform(Image, loc);

modifiedCenter = samplerTransform(Image, Center);

vec2 locR = (loc – modifiedCenter) * (1.0 / zoomR) + modifiedCenter;
vec2 locG = (loc – modifiedCenter) * (1.0 / zoomG) + modifiedCenter;
vec2 locB = (loc – modifiedCenter) * (1.0 / zoomB) + modifiedCenter;

vec4 pix;
pix.r = sample(Image, locR).r;
pix.g = sample(Image, locG).g;
pix.b = sample(Image, locB).b;
pix.a = 1.0;

return pix;
}

Currently, the controls are a bit, well, uncontrollable. I’ll have to work out some sensible scaling for them at some point (maybe with some exponential sliders).

zoomDistort RGB 01

zoomDistort RGB 02

24
Nov
07

zoomRGB

Inspired by this post on Vade’s blog, I created a simple CIKernel that allows independent zooming of the Red Green and Blue colour channels of an image.

Here for link to qcFX on Memo’s site.

tb chromaZoom 1.0

I actually put this together a while ago, but forgot about it until this evening.

23
Nov
07

zoomDistort

I had a brainwave while adding a simple zoom effect (using code from the guys at Vidvox) to another effect:
What would happen if I used the brightness value from the input image, or another image, to alter the zoom level on a per-pixel basis?

The results (with a few extra tweaks and additions) are intriguing.

tb zoomDistort

The hastily slapped-together CIKernel code looks like this:

kernel vec4 tb_zoomDistort(sampler Image, sampler Distortion, vec2 Center, float Level, float DistLevel)
{
vec2 loc;
vec2 modifiedCenter;
Center.x = Center.x / 2.0;
Center.y = Center.y / 2.0;

vec4 pix = sample(Distortion, samplerCoord(Distortion));
float offset = ((pix.r + pix.g + pix.b) / 3.0) * DistLevel;

float Level = Level + offset;

loc = destCoord();
loc = samplerTransform(Image, loc);
modifiedCenter = samplerTransform(Image, Center);
loc = (loc – modifiedCenter) * (1.0 / Level) + modifiedCenter;
return sample(Image, loc);
}

23
Nov
07

Exponential Controls

Quick tip:
Use the Interpolation Patch to give your controls different curves.

The key is to right-click the Patch, and set the Timebase to ‘External’.
Then, use a Splitter with a range of 0.0 to 1.0 connected to the Patch Time in port. You can then set the Start and End values to anything you like to scale the output. You can even set the Start value to a number greater than the End value, to reverse the action of the slider.
You’ll need to set the Duration to 2 also, or you’ll find that you’re not able to use the complete range of the control.

Control Interpolation

23
Nov
07

metaImage qcFX ‘Leopardised’

I’ve tweaked the metaImage qcFX to work in Leopard.
Annoyingly, looks like I might have to check all my previous qcFX for 10.5-compatability now, because this one didn’t work as it should initially.

I’ve also updated the scaling behaviour so you only get complete rows and columns, avoiding that annoying ‘scaling from bottom-left’ effect when the Cell Size slider is moved.
I’m considering retrofitting the XYPixellate effect with the same behavior.

Download link for tb_metaImage qcFX:

23
Nov
07

Cylinder Iterator

New qcFX. Another variation on the Iterator theme, this time using QC 3s new Cylinder primitive.

Up to 50 cylinder objects are nested inside each other, with the input image mapped onto their surfaces. Controls allow rotation of the elements, and incremental offsetting and rotation of each cylinder. I’ve also made use of the option to set the top and bottom width of the cylinders seperately, so you can create cone shapes too.

No coding in this one at all, just lots of nested macros!

tb cylinderIterator qcFX screenshot 01

tb cylinderIterator qcFX screenshot 02

22
Nov
07

Meta-Image

Recreation of the classic ‘Meta-Image’ effect, where the image is recreated from tiny copies of itself. This basic version took me about an hour to create, as it’s essentially just a variation on the pixellation effects I’ve done before.

tb metaImage 1.0

The plan is to add the ability to zoom each tile (maybe with the option also to set the centre-point of the zoom), and maybe centre each row and column so the effect appears to scale from the centre, rather than the bottom-left of the image when the Cell Size parameter is tweaked. Not quite sure how to do that yet though.Oddly, I’ve had to flip the image tiles vertically, otherwise they come out upside-down in VDMX (but the right way-up in Quartz Composer, bizarrely).

This is a Tiger version, but it should also work in Leopard.

19
Nov
07

DIY Accident

My laptop is out of action at the moment, so Quartz Composer work has slowed to a crawl. Hopefully I’ll have the machine up-and-running again sometime soon and my experiments can continue.

13
Nov
07

Distortion Gradients

These are some initial results from my experiments with using gradient sawtooth oscillators to control the horizontal and vertical ‘scanning’ of an image.

In the examples below, the overlaid color bars represent the gradients that produced the distortions to the image. The top bar controls the Vertical scan of the image, the bottom one the horizontal.

Distortion Gradient 02


Distortion Gradient 03

The distortions were produced by running the 2 colour-gradient oscillators through a very simple filter, which alters the levels of the Red Green and Blue channels independently. This has the effect of distorting the image in one of 3 seperate bands for each axis.

The source image is pretty grainy, I’m afraid.


November 2007
M T W T F S S
 1234
567891011
12131415161718
19202122232425
2627282930  

Links

Blog Stats

  • 502,032 hits